Viewed products


Confianza Online


domoticalia.es/es/ Reviews with ekomi.es

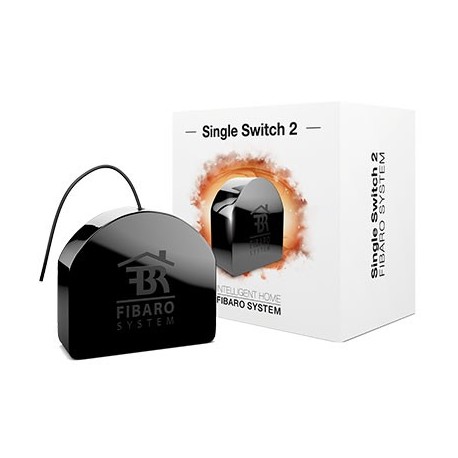
Fibaro -Single Switch 2- Micro-module relay simple On / Off Z-Wave + switch with consumption measurement

FGS-213

New

The Fibaro FGS-213 "Single Switch 2" micro-module relay / switch will allow you to control a light circuit or a remote device while keeping the existing conventional switch.

More details

In Stock

63,89 €

-20%

79,86 €

Technical characteristics

Technology Z-Wave Plus
Characteristic Consumption Measurement

More info

Fibaro's new single switch / relay, Fibaro FGS-213 "Single Switch 2" available as a single switch or relay was designed to activate and deactivate electrical devices. Thanks to its small size, it can be mounted inside mechanism boxes or appliance housings. The module is controlled either through the Z-Wave network or via a conventional switch. It has a function to measure power and energy consumption of use that allows you to control and reduce your electricity bills. Connect your Fibaro FGS-213 "Single Switch 2" in the Z-Wave home automation system together with other devices to enjoy almost infinite possibilities!

As it is 1 simple relay, it has 1 output:

  • 1 output of 8A max. (1920W max. At 240V) with resistive load.

Integrated scene trigger mechanism

communication classes and security notification
setup menu with a diode
Latest generation Z-Wave with 500 series chip
Z-Wave Plus compatible

Performs Z-Wave repeater functions
Measures energy and power of connected devices
Supports safe mode (Z-Wave Security Network) with AES-128 encryption
A complex control system for each channel
A complex scene activation system for each channel (scene management)
1 to 3 presses and keeping the key pressed can be assigned to four different actions
very accurate power measurement +/- 1% power above 5W
Smart notifications
Improved connections
simple setup menu
It has a test witness of coverage of the Z-Wave network
Software updates*
compatibility with certification confirmed by FCC, DEKRA, Z-Wave
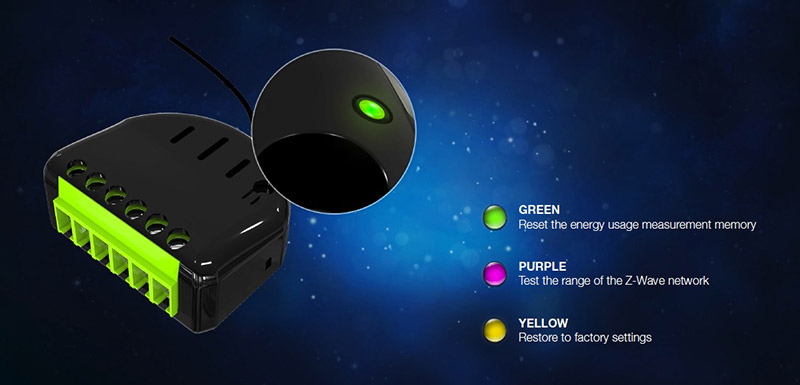
Z-Wave coverage check

Please note that this module requires NEUTRAL to operate. The output is not potential free, which makes it impossible to control a dry contact or to load another input supply voltage.

WE REPEAT: it cannot be used in a "dry contact" type connection scheme, as its predecessor, the Fibaro FGS-212, could.

Fibaro FGS-213 relay wiring diagram
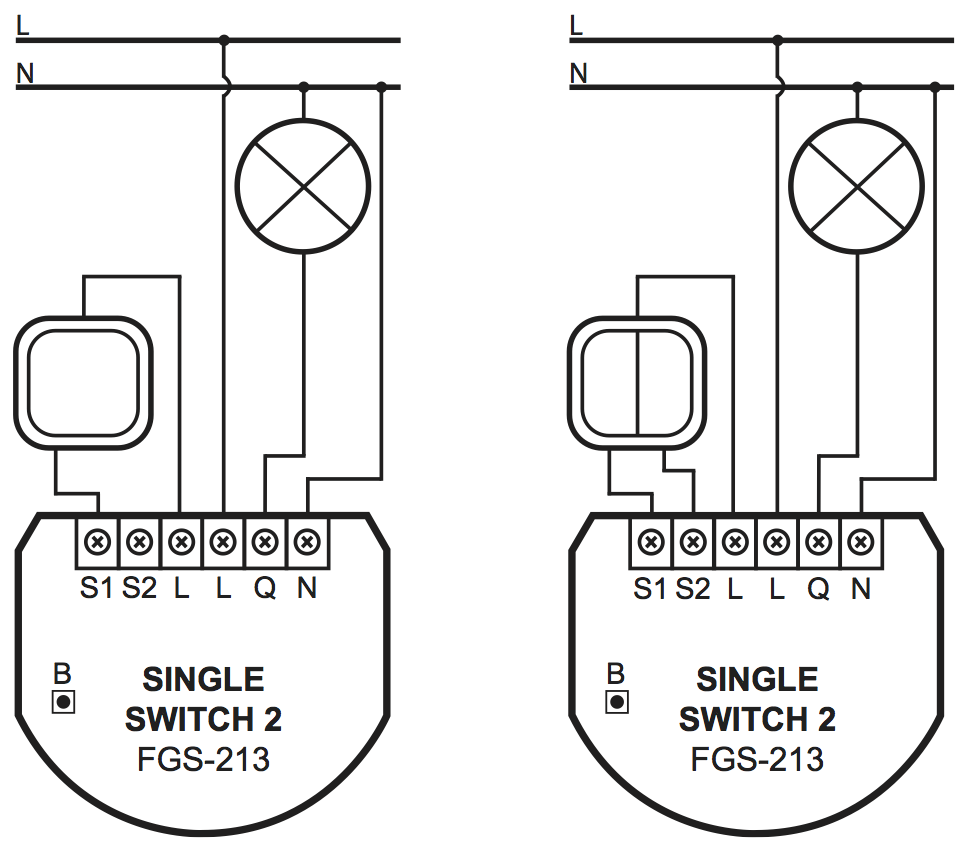
Fibaro FGS-213 wiring

Image of wiring with both 1 and 2 circuits

Summary:

1 output:

  • from 8A max. (1920W max. At 240V) with resistive load.


accurate measurement of consumption (+/- 1% of 5W).
Z-Wave + 500 Series (better remote communication).
secure communications with AES-128 encryption.
Ability to trigger home automation scenes through inputs S1 and S2 (4 possible scenes per button).
* check if the home automation controller is compatible with this specific feature
Configuration with interactive menu function and Z-Wave network tester with LED
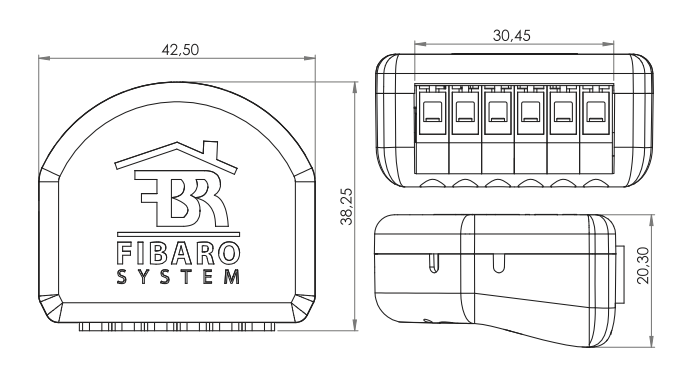
Rele fibaro size

Z-Wave Plus - Fibaro ZW5

Extended Z-Wave info

Name: Single Switch 2
Manufacturer:FIBARO
Identifier:FGS-213
Z-Wave Certification Number:ZC10-19076667
Hardware Plattform:ZM5101
FLiRS:NO
Role Type:Always On Slave
Short Description:FIBARO Single Switch 2 is designed to turn electrical devices on and off and to measure their power and energy consumption.
Description:The remotely operated FIBARO Single Switch 2 is designed to turn electrical devices on and off and to measure their power and energy consumption. The compact size of the device makes it the world's smallest of its type and allows for the product to be installed in wall switch boxes or housings. FIBARO Single Switch 2 can be controlled either via Z-Wave network or with a wall switch through a direct connection.

Manual download HERE.

Group
Max Nodes
Description
1
1
“Lifeline” reports the device status and allows for assigning single device only (main controller by default).
2
5
“On/Off (S1)” is assigned to switch connected to the S1 terminal (uses Basic command class).
3
5
“Dimmer (S1)” is assigned to switch connected to the S1 terminal (uses Switch Multilevel command class).
4
5
“On/Off (S2)” is assigned to switch connected to the S2 terminal (uses Basic command class).
5
5
“Dimmer (S2)” is assigned to switch connected to the S2 terminal (uses Switch Multilevel command class).
Number
Size (Bytes)
Default Value
Name
Description
10
1
0
First channel - operating mode
This parameter allows to choose operating for the 1st channel controlled by the S1 switch.
11
1
0
First channel - reaction to switch for delay/auto ON/OFF modes
This parameter determines how the device in timed mode reacts to pushing the switch connected to the S1 terminal.
12
2
50
First channel - time parameter for delay/auto ON/OFF modes
This parameter allows to set time parameter used in timed modes.
13
2
5
First channel - pulse time for flashing mode
This parameter allows to set pulse time used in flashing mode.
20
1
2
Switch type
This parameter as what type the device should treat the switch connected to the S1 and S2 terminals.
21
1
0
Flashing mode - reports
This parameter allows to define if the device sends reports during the flashing mode.
27
1
15
Associations in Z-Wave network security mode
This parameter defines how commands are sent in specified association groups: as secure or non-secure. Parameter is active only in Z-Wave network security mode. This parameter does not apply to 1st „Lifeline” group. NOTE Parameter 27 values may be combined, e.g. 1+2=3 means that 2nd & 3rd groups are sent as secure.
28
1
0
S1 switch - scenes sent
This parameter determines which actions result in sending scene assigned to them. NOTE Parameter 28 values may be combined, e.g. 1+2=3 means that scenes for single and double click are sent.
29
1
0
S2 switch - scenes sent
This parameter determines which actions result in sending scene IDs assigned to them. NOTE Parameter 29 values may be combined, e.g. 1+2=3 means that scenes for single and double click are sent.
30
1
0
S1 switch - associations sent to 2nd and 3rd association groups
This parameter determines which actions are ignored when sending commands to devices associated in 2nd and 3rd association group. All actions are active by default. NOTE Parameter 30 values may be combined, e.g. 1+2=3 means that associations for turning ON and OFF are not sent. NOTE *Hold and release is inactive when parameter 20 is set to 1 or 2. **Double click is inactive when parameter 20 is set to 1.
31
2
255
S1 switch - Switch ON value sent to 2nd and 3rd association groups
This parameter defines value sent with Switch ON command to devices associated in 2nd and 3rd association group.
32
2
0
S1 switch - Switch OFF value sent to 2nd and 3rd association groups
This parameter defines value sent with Switch OFF command to devices associated in 2nd and 3rd association group. NOTE Setting parameters 31-33, 36-38 to appropriate value should result in:
33
2
99
S1 switch - Double Click value sent to 2nd and 3rd association groups
This parameter defines value sent with Double Click command to devices associated in 2nd and 3rd association group.
35
1
0
S2 switch - associations sent to 4th and 5th association groups
This parameter determines which actions result in sending commands to devices associated in 4th and 5th association group. All actions are active by default. NOTE Parameter 35 values may be combined, e.g. 1+2=3 means that associations for turning ON and OFF are not sent. NOTE *Hold and release is inactive when parameter 20 is set to 1 or 2. **Double click is inactive when parameter 20 is set to 1.
36
2
255
S2 switch - Switch ON value sent to 4th and 5th association groups
This parameter defines value sent with Switch ON command to devices associated in 4th and 5th association group.
37
2
0
S2 switch - Switch OFF value sent to 4th and 5th association groups
This parameter defines value sent with Switch OFF command to devices associated in 4th and 5th association group.
38
2
99
S2 switch - Double Click value sent to 4th and 5th association groups
This parameter defines value sent with Double Click command to devices associated in 4th and 5th association group.
40
1
3
Reaction to General Alarm
This parameter determines how the device will react to General Alarm frame
41
1
2
Reaction to Flood Alarm
This parameter determines how the device will react to Flood Alarm frame.
42
1
3
Reaction to CO/CO2/Smoke Alarm
This parameter determines how the device will react to CO, CO2 or Smoke frame.
43
1
1
Reaction to Heat Alarm
This parameter determines how the device will react to Heat Alarm frame.
44
2
600
Flashing alarm duration
This parameter allows to set duration of flashing alarm mode.
50
1
20
First channel - power reports
This parameter determines the minimum change in consumed power that will result in sending new power report to the main controller.
51
1
10
First channel - minimal time between power reports
This parameter determines minimum time that has to elapse before sending new power report to the main controller.
53
2
100
First channel - energy reports
This parameter determines the minimum change in consumed energy that will result in sending new energy report to the main controller.
58
2
3600
Periodic power reports
This parameter determines in what time interval the periodic power reports are sent to the main controller.
59
2
3600
Periodic energy reports
This parameter determines in what time interval the periodic energy reports are sent to the main controller.
60
1
0
Measuring energy consumed by the device itself
This parameter determines whether energy metering should include the amount of energy consumed by the device itself. Results are being added to energy reports for first endpoint.
9
1
1
Restore state after power failure
This parameter determines if the device will return to state prior to the power failure after power is restored.
Basic
COMMAND_CLASS_BASIC
Notification V5
COMMAND_CLASS_NOTIFICATION_V5
Switch Multilevel V3
COMMAND_CLASS_SWITCH_MULTILEVEL_V3
Application Status
COMMAND_CLASS_APPLICATION_STATUS
Association Group Info
COMMAND_CLASS_ASSOCIATION_GRP_INFO
Association V2
COMMAND_CLASS_ASSOCIATION_V2
Basic
COMMAND_CLASS_BASIC
Central Scene V2
COMMAND_CLASS_CENTRAL_SCENE_V2
Configuration
COMMAND_CLASS_CONFIGURATION
CRC16 Encapsulation
COMMAND_CLASS_CRC_16_ENCAP
Device Reset Locally
COMMAND_CLASS_DEVICE_RESET_LOCALLY
Firmware Update Meta-Data V3
COMMAND_CLASS_FIRMWARE_UPDATE_MD_V3
Manufacturer Specific V2
COMMAND_CLASS_MANUFACTURER_SPECIFIC_V2
Meter V3
COMMAND_CLASS_METER_V3
Multi-Channel Association V3
COMMAND_CLASS_MULTI_CHANNEL_ASSOCIATION_V3
Multi-Channel V4
COMMAND_CLASS_MULTI_CHANNEL_V4
Notification V5
COMMAND_CLASS_NOTIFICATION_V5
Powerlevel
COMMAND_CLASS_POWERLEVEL
Protection V2
COMMAND_CLASS_PROTECTION_V2
Security S0
COMMAND_CLASS_SECURITY
Switch Binary
COMMAND_CLASS_SWITCH_BINARY
Version V2
COMMAND_CLASS_VERSION_V2
Z-Wave Plus Info V2
COMMAND_CLASS_ZWAVEPLUS_INFO_V2
Exclusion
1) Make sure the Switch 2 is within the direct range of your Z-Wave controller.

2) Identify the S1 switch or the B-button (located on the device’s housing).

3) Set the main controller in remove mode (see the controller’s manual).

4) Quickly, three times press the S1 switch or the B-button.

5) Wait for the removing process to end.

6) Successful removing will be confirmed by the Z-Wave controller’s message

Inclusion
1) Switch off the mains voltage (disable the fuse).

2) Make sure the Switch 2 is within the direct range of your Z-Wave controller.

3) Connect the device in accordance with one of the diagrams included in the manual.

4) After verifying correctness of the connection switch on the mains voltage.

5) Identify the S1 switch or the B-button (located on the device’s housing).

6) Set the main controller in (security/non-security) add mode (see the controller’s manual).

7) Quickly, three times press the S1 switch or the B-button.

8) Wait for the adding process to end.

9) Successful adding will be confirmed by the Z-Wave controller’s message.

Factory Reset
Reset procedure allows to restore the device back to its factory settings, which means all information about the Z-Wave controller and user configuration will be deleted. In order to reset the device:


1) Switch off the mains voltage (disable the fuse).

2) Remove the Switch 2 from the wall switch box.

3) Switch on the mains voltage.

4) Press and hold the B-button to enter the menu.

5) Wait for the visual LED indicator to glow yellow.

6) Quickly release and click the B-button again.

7) After few seconds the device will be restarted, which is signalled with the red LED indicator colour.


Use reset procedure only if the primary controller is missing or inoperable.

Device Wake-Up
The FIBARO Single Switch 2 is powered with the mains voltage so it is always awake.
Additional Special Features
Z-Wave Plus communication protocol

Active power and energy metering functionality

Z-Wave range tester

LED diode


Color
If the product is only available in one color, pick the color from the list.
Supported Meter Type
Indicate which type of metering is supported by the device.
Supported Notification Types
Select the Notification Types that the product handles (controllers), or sends (slaves).
Switch Load Capacity Current
The amount of switch load energy the product is rated for in Amps
Switch Load Capacity Watts
The amount of switch load energy the product is rated for in Watts


Reviews

Write a review

Fibaro -Single Switch 2- Micro-module relay simple On / Off Z-Wave + switch with consumption measurement

Fibaro -Single Switch 2- Micro-module relay simple On / Off Z-Wave + switch with consumption measurement

The Fibaro FGS-213 "Single Switch 2" micro-module relay / switch will allow you to control a light circuit or a remote device while keeping the existing conventional switch.

30 other products in the same category:

Customers who bought this product also bought: