Productos más vistos


Confianza Online


domoticalia.es/es/ Reviews with ekomi.es

Qubino Flush 1 Relay

ZMNHAD1

Nuevo

Micromódulo de 1 relé con control de consumo Qubino Flush 1 Relay para encender/apagar, con tecnología Z-Wave Plus. Se trata de un relé usado para encender o apagar (On/Off - todo/nada) dispositivos eléctricos tales como luces, ventiladores, hornos, lavadoras, planchas, enchufes de potencia, puertas de garaje, radiadores eléctricos, calentadores de agua, etc...

Más detalles

En Stock - Envío inmediato

60,11 €

-12%

68,30 €

Características técnicas

Tecnología Domótica Z-Wave Plus
Característica Medición de Consumo

Descripción

El relé Z-Wave más pequeño del mundo

El Qubino Flush 1 Relay es ideal como interruptor eléctrico para luces, ventiladores, hornos, lavadoras, planchas, tomas de corriente, puertas de garaje, radiadores eléctricos, calentadores de agua, etc. Puede controlarlo remotamente a través de la red Z-Wave o a través de interruptores de pared. También mide el consumo de energía y soporta la conexión de un sensor de temperatura digital.

El relé Z-Wave más pequeño

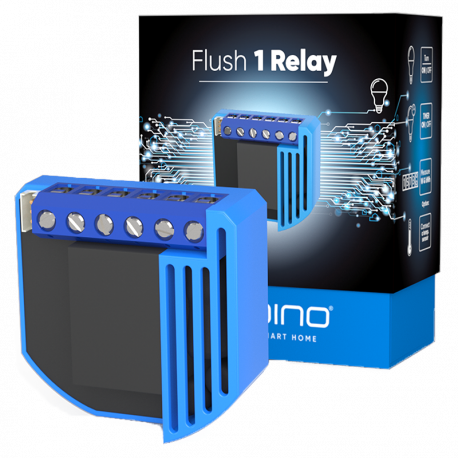
El relé Z-Wave Qubino Flush 1 Relay es un micromódulo que ocupa menos espacio que cualquier otro modulo con el que se le compare de cualquier otro competidor y encajará fácilmente en cualquier caja de mecanismo convencional.

Qubino Flush 1 Relay

Este micromódulo Z-Wave Qubino Flush 1 Relay es un relé usado para encender o apagar (On/Off - todo/nada) dispositivos eléctricos tales como luces, ventiladores, hornos, lavadoras, planchas, enchufes de potencia, puertas de garaje, radiadores eléctricos, calentadores de agua, etc...

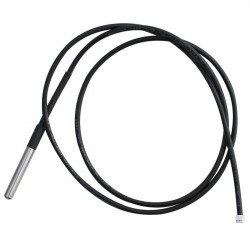
Este micromódulo de relé oculto, Qubino Flush 1 Relay dispone de una entrada para conectar una sonda de temperatura, lo que lo adecúa para controlar sistemas de calefacción o de aire acondicionado.

¿Para qué se puede usar?

El Qubino Flush 1 Relay es ideal para el control remoto y el cambio de dispositivos eléctricos (por ejemplo luces o ventiladores).

Control energético

El relé simple Z-Wave Qubino Flush 1 Relay, hace medición de consumo eléctrico del aparato eléctrico conectado y de por sí, cuando está en "standby" tan sólo consume 0.4 W.

Muy versátil

El Qubino Flush 1 Relay, puede operar a través de un extenso rango de temperaturas desde los fríos -10˚C a los sofocantes 40˚C (14˚–104˚F). Soporta la conexión de un sensor de temperatura digital, que también es útil para crear escenarios complejos. Cada módulo también actúa como un repetidor con el fin de mejorar el alcance y la estabilidad de la red Z-Wave.

La instalación más sencilla.

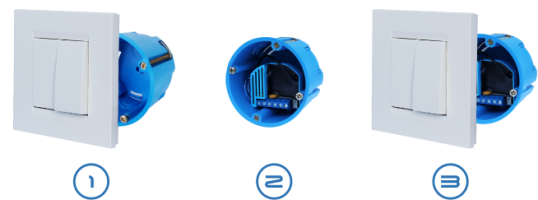
El tamaño extremadamente pequeño y una carcasa especialmente diseñada significan que la conexión del módulo dentro de una caja de montaje empotrada es sencillo. El proceso de instalación, probado y aprobado por electricistas profesionales, consta de sólo tres sencillos pasos:

1 - Retire los interruptores de la caja y desconecte los cables.
2 - Conecte los cables al módulo Qubino e insértelos en la caja.
3 - Fije los interruptores a la caja.
Los módulos Z-Wave más probados y más fiables

Los módulos Z-Wave de Qubino son productos de “instalar-y-olvidarte”. Los productos Qubino que te ofrecemos, están fabricados para durar, por lo que sólo utilizan componentes electrónicos que cumplan los más exigentes niveles de calidad. Nuestros módulos además son los micromodulos Z-Wave más testeados del mercado. El Instituto Esloveno de Calidad y Medición (The Slovenian Institute of Quality and Metrology (SIQ)), una entidad europea independiente, comprueba la calidad de los parámetros reales de nuestros productos, incluyendo el aumentos de temperatura, fabricación, resistencia del aislamiento, consumo eléctrico y sobrecargas de acuerdo las normas europeas de la máxima calidad conforme a la especificación del estándar EN 60669-2-1.

Parámetros adicionales para profesionales.

El micromódulo Qubino Flush 1 Relay dispone de 15 parámetros adicionales para su uso por expertos. Algunos de los más útiles son

  • Ajuste del tipo mono-estable (pulsador) o bi-estable
  • Activar o desactivar las funciones ALL ON / ALL OFF
  • Salida de encendido / apagado automático después del tiempo establecido

El micromódulo puede ser controlado tanto a través de una red Z-Wave como a través de un interruptor de pared. Este módulo ha sido diseñado para ser montado dentro de una caja de mecanismo y oculto detrás de un interruptor de pared convencional.

Resaltamos como ventaja respecto a otros reguladores, que el micromódulo Qubino Flush 1 Relay es capaz de controlar el consumo eléctrico de la carga conectada (alumbrado, ventilador...). Además dispone un conector al cual se puede conectar una sonda de temperatura (opcional; no incluida) para dotar de mayor versatilidad a este módulo, que aparte del control de alumbrado, nos ofrece control de consumo eléctrico e información de la temperatura de la estancia en la que se haya instalado.

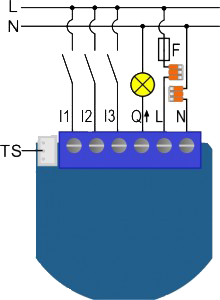
Esquemas Eléctricos y especificaciones técnicas:
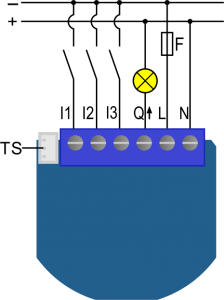
Esquemas Electricos Qubino Flush 1 Relay

 Esquemas Electricos Qubino Flush 1 Relay

Destacamos que Qubino nos ofrece normas de calidad, seguridad y durabilidad muy estrictas en la fabricación de sus micromódulos ocultos. Hay que señalar la selección de componentes de alta calidad y altas prestaciones, como son el uso de componentes internos de la marca Omron.

Alimentación: 110 – 230 VAC ± 10%
50 / 60 Hz, (24–30 VDC)
Carga máxima de salida AC (carga resistiva)* 1 X 10 A / 230 VAC
Carga máxima de salida DC (carga resistiva)* 1 X 10 A / 30 VDC
Output circuit power of AC output (resistive load): 2300 W (230 VAC)
Output circuit power of DC output (resistive load): 240 W (24 VDC)
Precisión de la medición de potencia: P = 5–50 W, +/-3 W
P > 50 W, +/-3%
Rango del sensor digital de temperatura: -50° ~ +125°C, resolucion 0.1°C
Longitud del cable del sensor digital de temperatura: 1000 mm
Temperatura de Operacion: -10° ~ +40°C
Distancia hasta 30 m en interior (dependiendo de materiales)
Dimensiones (WxHxD) 41.8 x 36.8 x 15.4 mm
(packaging) (115 x 96 x 22)
Peso (incluyendo packaging) 48 g (64 g)
Consumo electrico en standby 0.4 W
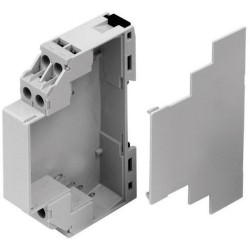
Para instalación en cajas de mecanismo Ø ≥ 60 mm or 2 M
Conmutación mediante: Relé

* En el caso de cargas distintas de las resistivas, preste atención al valor de cosφ y, si es necesario, utilice una carga inferior a la carga nominal. La corriente máxima para cosφ = 0,4 es 3 A a 250 VAC, 3 A a 24 VDC L / R = 7 ms.

Cumple Certificaciones CE y ROHS

Descargar

Qubino_Flush-1Relay-manualV14

Manual del Usuario Qubino Flush 1 Relay (ingles)

Descargar (620.65k)

Información Ampliada Z-Wave (Inglés)

Nombre: Flush 1 Relay
Fabricante:QUBINO
Identificador:ZMNHAD1
Número de Certificación Z-Wave:ZC10-18015974
Plataforma Hardware:ZM5202
FLiRS:NO
Tipo de Role:Always On Slave
Descripción Corta:The Qubino Flush 1 Relay is ideal for remotely controlling one light or electrical device (door lock, door opener, small appliances, etc.).
Descripción:The Flush 1 Relay controls on/off function for one electrical device. It measures power consumption of the connected device, and can be paired with a digital temperature sensor (sold separately). It supports push-button/momentary switches and toggle switches (default). The connection of a digital temperature sensor means you can create complex scenes and control any device relative to a set temperature range. The Qubino Flush 1 Relay also acts as a Z-Wave repeater to improve the range and stability of the Z-Wave network.

Descargue el manual desde aquí.

Grupo
Max Nodos
Descripción
1
1
Lifeline group (reserved for communication with the primary gateway (hub)), 1 node allowed.
2
16
Basic on/off (status change report for Q⬆ load), up to 16 nodes.
3
16
Basic on/off (status change report for I2 input), up to 16 nodes.
4
16
Notification report (status change report for I2 input), up to 16 nodes.
5
16
Binary sensor report (status change of the I2 input), up to 16 nodes.
6
16
Basic on/off (status change report for I3 input), up to 16 nodes.
7
16
Notification report (status change report for I3 input), up to 16 nodes.
8
16
Binary sensor report (status change of the I3 input), up to 16 nodes.
9
16
Multilevel sensor report (triggered at change of temperature sensor) up to 16 nodes.
Número
Tamaño (Bytes)
Valor por Defecto
Nombre
Descripción
1
1
1
In-wall Switch Type for Load 1 (Q⬆) to control I1
With this parameter, you can select between push-button (momentary) and on/off toggle switch types.
10
2
255
Activate / deactivate ALL ON / ALL OFF Functionality
Flush 1 Relay device responds to commands ALL ON / ALL OFF that may be sent by the primary or secondary gateway (hub) within the Z-Wave network.
100
1
0
– Enable / Disable Endpoint I2 or select the Notification Type and the Notification Event
Choose whether the Endpoint I2 is disabled (and not shown on the UI) or enabled (and displayed on the UI). By enabling this endpoint (setting it to be either a notification sensor or a binary sensor), the user also selects a Notification Type and a Notification Event for which notification reports will be sent (in case the endpoint is configured as a notification sensor). Endpoint device type selection: -notification sensor (1 - 6): GENERIC_TYPE_SENSOR_NOTIFICATION, SPECIFIC_TYPE_NOTIFICATION_SENSOR -sensor binary (9): GENERIC_TYPE_SENSOR_BINARY, SPECIFIC_TYPE_NOT_USED Values (size is 1 byte dec): • 9 - Sensor binary NOTE 1: After changing the values of the parameter, first exclude the device (without setting the parameters to their default values), then wait at least 30 seconds to re-include the device! NOTE 2: When the parameter is set to value 9 the notifications are sent for the Home Security notification type.
101
1
0
Enable / Disable Endpoint I3 or select the Notification Type and the Notification Event
Choose whether the Endpoint I3 is disabled (and not shown on the UI) or enabled (and displayed on the UI). By enabling this endpoint (setting it to be either a notification sensor or a binary sensor), the user also selects a Notification Type and a Notification Event for which notification reports will be sent (in case the endpoint is configured as a notification sensor). Endpoint device type selection: -notification sensor (1 - 6): GENERIC_TYPE_SENSOR_NOTIFICATION, SPECIFIC_TYPE_NOTIFICATION_SENSOR -sensor binary (9): GENERIC_TYPE_SENSOR_BINARY, SPECIFIC_TYPE_NOT_USED Values (size is 1 byte dec): • 9 - Sensor binary NOTE 1: After changing the values of the parameter, first exclude the device (without setting the parameters to their default values), wait at least 30 seconds and then re-include the device! NOTE 2: When the parameter is set to the value 9 the notifications are sent for the Home Security notification type.
11
2
0
Turn Load 1 (Q⬆) Off Automatically with Timer
If Load 1 (Q⬆) is ON, you can schedule it to turn OFF automatically after a period of time defined in this parameter. The timer is reset to zero each time the device receives an ON command, either remotely (from the gateway (hub) or associated device) or locally from the switch.
110
2
32536
Temperature Sensor Offset Settings
Set value is added to or subtracted from the actual measured value to adjust the temperature report sent by an external sensor (sold separately). This parameter only applies to Celsius temperature unit (the Fahrenheit unit is currently not supported).
12
1
0
Turn Load 1 (Q⬆) On Automatically with Timer
If Load (Q⬆) is OFF, you can schedule it to turn ON automatically after a period of time defined in this parameter. The timer is reset to zero each time the device receives an OFF command, either remotely (from the gateway (hub) or associated device) or locally from the switch.
120
1
5
Temperature Sensor Reporting Threshold If
If an external digital temperature sensor (sold separately) is connected to the device, it reports temperature readings based on the threshold defined in tIf an external digital temperature sensor (sold separately) is connected to the device, it reports temperature readings based on the threshold defined in this parameter. This parameter only applies to the Celsius temperature unit (the Fahrenheit unit is currently not supported).his parameter. This parameter only applies to the Celsius temperature unit (the Fahrenheit unit is currently not supported).
15
1
0
Set Timer Units to Seconds or Milliseconds
Choose if you want to set the timer in seconds or milliseconds in parameters 11 and 12. Please note that the value for this parameter applies to settings for Q⬆ load in all of the above parameters (timer on / timer off).
2
1
0
Input 2 contact type
This parameter defines input 2 contact type.
3
1
0
Input 3 contact type
This parameter defines input 3 contact type.
30
1
0
Restore on/off status for Q⬆ load after power failure
This parameter determines if on/off status is saved and restored for the load Q⬆ after power failure.
40
1
10
Watt Power Consumption Reporting Threshold for Q⬆ Load
Choose by how much power consumption needs to increase or decrease to be reported. Values correspond to percentages so if 10 is set (by default), the device will report any power consumption changes of 10% or more compared to the last reading. NOTE: Power consumption needs to increase or decrease by at least 1 Watt to be reported, REGARDLESS of percentage set in this parameter.
42
2
0
Watt Power Consumption Reporting Time Threshold for Q⬆ Load
Set value refers to the time interval with which power consumption in Watts is reported (0 – 32535 seconds). If 300 is entered (by default), energy consumption reports will be sent to the gateway (hub) every 300 seconds (or 5 minutes).
63
1
0
Choose Normally Closed or Normally Open for Q⬆ Load
Set value determines the type of the device connected to the Q⬆ output. The output type can be normally open (NO) or normally closed (NC).
Basic
COMMAND_CLASS_BASIC
Association Group Information V2
COMMAND_CLASS_ASSOCIATION_GRP_INFO_V2
Association V2
COMMAND_CLASS_ASSOCIATION_V2
Basic
COMMAND_CLASS_BASIC
Configuration
COMMAND_CLASS_CONFIGURATION
Device Reset Locally
COMMAND_CLASS_DEVICE_RESET_LOCALLY
Manufacturer Specific V2
COMMAND_CLASS_MANUFACTURER_SPECIFIC_V2
Meter V4
COMMAND_CLASS_METER_V4
Multi-Channel Association V3
COMMAND_CLASS_MULTI_CHANNEL_ASSOCIATION_V3
Multi-Channel V4
COMMAND_CLASS_MULTI_CHANNEL_V4
Notification V5
COMMAND_CLASS_NOTIFICATION_V5
Powerlevel
COMMAND_CLASS_POWERLEVEL
Security S0
COMMAND_CLASS_SECURITY
Sensor Binary
COMMAND_CLASS_SENSOR_BINARY
Sensor Multilevel V7
COMMAND_CLASS_SENSOR_MULTILEVEL_V7
Switch All
COMMAND_CLASS_SWITCH_ALL
Switch Binary
COMMAND_CLASS_SWITCH_BINARY
Version V2
COMMAND_CLASS_VERSION_V2
Z-Wave Plus Info V2
COMMAND_CLASS_ZWAVEPLUS_INFO_V2
Inclusion
AUTOMATICALLY ADDING THE DEVICE TO A Z-WAVE NETWORK (AUTO INCLUSION)


1. Enable add/remove mode on your Z-Wave gateway (hub)

2. Connect the device to the power supply (with the temperature sensor already connected – sold separately*).

3. Auto-inclusion will be initiated within 5 seconds of connection to the power supply and the device will automatically enrol in your network


MANUALLY ADDING THE DEVICE TO A Z-WAVE NETWORK (MANUAL INCLUSION)


1. Enable add/remove mode on your Z-Wave gateway (hub)

2. Connect the device to the power supply (with the temperature sensor already connected*)

3. Toggle the switch connected to the I1 terminal 3 times within 5 seconds

OR

If the device is powered by 24 V SELV supply, press and hold the S (Service) button between 2 and 6 seconds

4. A new multi-channel device will appear on your dashboard

*If connecting the temperature sensor, switch off the power supply and make sure the device is excluded from your network BEFORE connecting the sensor.


*Make sure the device is excluded from your network before connecting the temperature sensor. Switch off the power supply, connect the temperature sensor, and re-include the device to your network.

Exclusion
REMOVAL FROM A ZWAVE NETWORK (Z-WAVE EXCLUSION)


1. Connect the device to the power supply

2. Make sure the device is within direct range of your Z-Wave gateway (hub) or use a hand-held Z-Wave remote to perform exclusion

3. Enable add/remove mode on your Z-Wave gateway (hub)

4. Toggle the switch connected to the I1 terminal 3 times within 5 seconds

OR

If the device is powered by 24 V SELV supply, press and hold the S (Service) button between 2 and 6 seconds

5. The device will be removed from your network but any custom configuration parameters will not be erased

Factory Reset
FACTORY RESET


1. Connect the device to the power supply

2. Within the first minute (60 seconds) the device is connected to the power supply, toggle the switch connected to the I1 terminal 5 times within 5 seconds (5 times change switch state)

OR

If the device is powered by 24 V SELV supply, press and hold the S (Service) button for more than 6 seconds


*By resetting the device, all custom parameters previously set on the device will return to their default values, and the owner ID will be deleted. Use this reset procedure only when the main gateway (hub) is missing or otherwise inoperable.

Neutral Wire Required
For electric in-wall/wired switches, indicate whether a neutral wire is required for installation.
Color
If the product is only available in one color, pick the color from the list.
Supported Meter Type
Indicate which type of metering is supported by the device.
Sensors
Sensor types supported by the product.
Supported Notification Types
Select the Notification Types that the product handles (controllers), or sends (slaves).


Opiniones

Escribe tu opinión

Qubino Flush 1 Relay

Qubino Flush 1 Relay

Micromódulo de 1 relé con control de consumo Qubino Flush 1 Relay para encender/apagar, con tecnología Z-Wave Plus. Se trata de un relé usado para encender o apagar (On/Off - todo/nada) dispositivos eléctricos tales como luces, ventiladores, hornos, lavadoras, planchas, enchufes de potencia, puertas de garaje, radiadores eléctricos, calentadores de agua, etc...

Accesorios, complementos y/o alternativas

Los clientes que compraron este producto también han comprado...