Carrinho
0
Produto
Produtos
(vazio)
Sem produtos
Envio grátis!
Envio
0,00 €
IVA
0,00 €
Total
Preços com IVA
Produto adicionado com sucesso ao seu carrinho de compras
Quantidade
Total
Existem 0 produtos no seu carrinho de compras. Existe um produto no seu carrinho de compras.
Total produtos
(com IVA)
Total portes (com IVA)
Envio grátis!
IVA
0,00 €
Total
(com IVA)
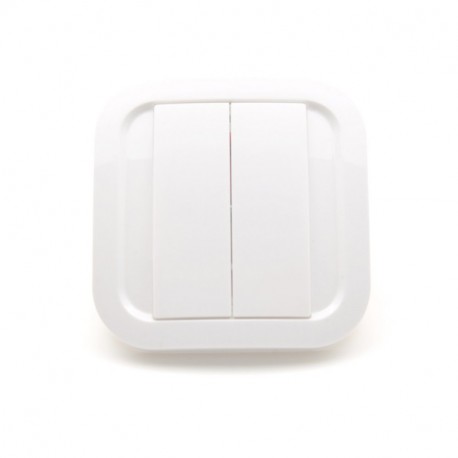
Interruptor de parede NODON Z-Wave Plus (Branco)
Interruptor de parede NODON Z-Wave Plus (Branco)
CWS-3-1-01
Novo
NODON interruptor de parede duplo Z-Wave Plus cor branca
Não disponível
- Retirar este produto da minha lista de favoritos.
- Adicionar este produto à minha lista de favoritos.
Características tecnicas
| Tecnologia Domótica | Z-Wave Plus |
Mais Informação
É um controlador Z-Wave "dual-key" que permite controlar outros dispositivos, como dimmers, interruptores ou persianas. Também pode ser usado para controlar cenas. Existem quatro botões por trás das teclas para gerenciar e configurar a rede Z-Wave (incluir dispositivos, excluir associações estabelecidas, etc.). É alimentado por baterias, por isso não requer sua instalação em um mecanismo convencional ou caixa registradora. Inclui fita adesiva dupla face, para que possa ser instalada em qualquer superfície.
As especificações técnicas:
- Comportamento sem fio: transmissor
- Tipo de dispositivo Z-Wave: Controller
- Protocolo Z-Wave Plus
- Grupos de Z-Wave controláveis: 2 ou 4 cenas diferentes
- Alcance da antena: até 40 m em edifícios
- Display: LED para confirmar as operações sem fio
- Operação local: usando duas chaves
- Controle e Configuração: 4 botões mais LED atrás da chave do interruptor
- Montagem: em qualquer superfície plana, não requer caixa de mecanismo
- Fonte de alimentação: bateria CR2032
- Dimensões: 80 * 80 * 15
Download
Informação alargada da Z-Wave (Inglês)
Nome: NodOn® wall switch
Fabricante:NodOn
Identificador:CWS-3-1-0X
Número de Certificação Z-Wave :ZC10-15070008
Plataforma de Hardware :ZM5202
FLiRS:Não
Tipo de Role :Portable Controller
Descrição breve :The NodOn® wall switch controls any compatible receivers Z-Wave® or Z-Wave Plus®. It can operate on its own (“Standalone” Mode) or as gateway’s assistant (“Gateway” Mode). The product integrates a LED as an intuitive feedback tool.
Descrição :The NodOn® wall switch controls any compatible receivers Z-Wave® or Z-Wave Plus®, such as the Smart Plug NodOn®. It can address, directly, up to 4 groups of 8 devices and sent up to 16 different scenes to a Home Automation Gateway. This controller can operate on its own (“Standalone” Mode) or as gateway’s assistant (“Gateway” Mode). The product integrates a LED, which give an intuitive feedback for each operation you perform.
Based on an innovative technology, the NodOn® wall switch is only powered with a CR2032 battery, offering 2 years’ autonomy.
The NodOn® wall switch can be screwed or bonded thanks of the
adhesive tape included.
The NodOn® wall switch is based on brand new 500 series Z-Wave® module from Sigma Designs®, and supports all the new features of Z-Wave Plus® standard:
Longer range (up to 40 meters indoor), lower power consumption, higher data rate transmission, and many more new features.
Descarregue o manual a partir de aqui.
Grupo
Nodos máximos
Descrição
1
1
Z-Wave Plus® Lifeline. This group is used to report information of the OCTAN Remote to the Main Controller of the network.
2
8
Button 1 – MONO – Controlled nodes • A short press will activate (ON) your associated devices • A second short press will deactivate (OFF) your associated devices. If some of the associated devices have dimming features (light dimmer, roller shutter, etc.): • A long press will dim up your associated devices (light, roller shutter, etc.) until you release the button • A second long press on the same button will dim down your associated devices (light, roller shutter, etc.) until you release the button.
3
8
Button 2 – MONO – Controlled nodes • A short press will activate (ON) your associated devices • A second short press will deactivate (OFF) your associated devices. If some of the associated devices have dimming features (light dimmer, roller shutter, etc.): • A long press will dim up your associated devices (light, roller shutter, etc.) until you release the button • A second long press on the same button will dim down your associated devices (light, roller shutter, etc.) until you release the button.
4
8
Button 3 – MONO – Controlled nodes • A short press will activate (ON) your associated devices • A second short press will deactivate (OFF) your associated devices. If some of the associated devices have dimming features (light dimmer, roller shutter, etc.): • A long press will dim up your associated devices (light, roller shutter, etc.) until you release the button • A second long press on the same button will dim down your associated devices (light, roller shutter, etc.) until you release the button.
5
8
Button 4 – MONO – Controlled nodes • A short press will activate (ON) your associated devices • A second short press will deactivate (OFF) your associated devices. If some of the associated devices have dimming features (light dimmer, roller shutter, etc.): • A long press will dim up your associated devices (light, roller shutter, etc.) until you release the button • A second long press on the same button will dim down your associated devices (light, roller shutter, etc.) until you release the button.
6
8
Buttons 1&3 – DUO – Controlled nodes • A short press on button 1 will activate (ON) your associated devices. • A short press on button 3 will deactivate (OFF) your associated devices. If some of the associated devices have dimming features (light dimmer, roller shutter, etc.): • A long press on button 1 will dim up your associated device (light, roller shutter, etc.) until you release the button. • A long press on button 3 will dim down your associated device (light, roller shutter, etc.) until you release the button.
7
8
Buttons 2&4 – DUO – Controlled nodes • A short press on button 2 will activate (ON) your associated devices. • A short press on button 4 will deactivate (OFF) your associated devices. If some of the associated devices have dimming features (light dimmer, roller shutter, etc.): • A long press on button 1 will dim up your associated device (light, roller shutter, etc.) until you release the button. • A long press on button 3 will dim down your associated device (light, roller shutter, etc.) until you release the button.
Número
Tamanho (Bytes)
Valor por defeito
Nome
Descrição
1
1
0
Buttons 1&3 Profile
To set-up the profie of buttons 1 & 3s
2
1
0
Buttons 2&4 Profile
To set-up the profie of buttons 2 & 4
3
1
0
Scene Type
To choose the way of sending Scene to the gateway
4
1
0
Button 1 Configuration
To set-up the how button 1 behaves, when set in MONO Profie
5
1
0
Button 2 Configuration
To set-up the how button 2 behaves, when set in MONO Profie
6
1
0
Button 3 Configuration
To set-up the how button 3 behaves, when set in MONO Profie
7
1
0
Button 4 Configuration
To set-up the how button 4 behaves, when set in MONO Profie
8
1
0
Led Management
How to set up LED behaviour
Controller Inclusion
1- Push 3 times (quickly) on the button 3. The LED blinks in blue.
2- Place the device you want to add in “Learning” Mode. To do so, please refer to your device’s user guide. The LED blinks in green to confirm the inclusion.
Note: If you wish to include and associate a device, please refer to ""Other Special Features""
2- Place the device you want to add in “Learning” Mode. To do so, please refer to your device’s user guide. The LED blinks in green to confirm the inclusion.
Note: If you wish to include and associate a device, please refer to ""Other Special Features""
Controller Exclusion
1- Push 3 times (quickly) on the button 2. The LED blinks in blue.
2- Place the device you want to remove in “Learning” Mode. To do so, please refer to your device’s user guide. The LED blinks in green to confirm the exclusion.
2- Place the device you want to remove in “Learning” Mode. To do so, please refer to your device’s user guide. The LED blinks in green to confirm the exclusion.
Factory Reset
Simultaneously push on buttons 3 and 4, during 1 second. The LED will blink red and green to validate the factory reset.
A factory reset will completely delete the memory of the wall switch and restore all parameters to default value.
In ""Standalone"" Mode, make sure to remove all the devices added or associated in the wall switch's network before performing a factory reset.
In ""Gateway"" Mode, use the factory reset procedure only when the primary controller (i.e the Gateway) is missing or defective. Reset the wall switch does not mean that it has been removed from the primary controller memory. Remove the wall switch (through the primary controller) before performing a factory reset.
Additional Special Features
Association, in ""Standalone"" mode is performed in 3 steps:
1- Push 3 times (quickly) on the button 1 to activate the ""Association” Mode. The LED glows in blue.
2- Choose which button will control your device.
• A short press on one of the buttons of the wall switch (1, 2, 3 or 4) will activate the MONO Profile. The pressed button will then control your device.
• A long press on the button 1 will activate the DUO Profile, combined with the button 3. The button 1 (ON) and button 3 (OFF) will then control your device.
• A long press on the button 2 will activate the DUO Profile, combined with the button 3. The button 2 (ON) and button 4 (OFF) will then control your device.
The LED blinks in blue to confirm your choice.
3-Place the device you want to associate in “Learning” Mode. To do so, please refer to your device’s user guide. The LED of the wall switch blinks green to confirm the association process
Careful: In case of a too long association process or others problems during the process, the LED will blink red (Timeout). Please restart the procedure.
Once the association is validated, your wall switch is able to control your device. Different actions are possible.
Device Wake-Up
When the product in ""Gateway"" mode, any action on button will send a wake up notification to the gateway.
Learn Mode (adding another controller)
1- Place your home automation gateway into “Inclusion” Mode. To do so, please refer to your gateway’s user guide.
2- Simultaneously push on buttons 1 and 2, during 1 second. The LED glows in pink to confirm the selection.
3- Push on button 1. The LED blinks in pink to confirm your choice.
4- The LED blinks in green to confirm the procedure
2- Simultaneously push on buttons 1 and 2, during 1 second. The LED glows in pink to confirm the selection.
3- Push on button 1. The LED blinks in pink to confirm your choice.
4- The LED blinks in green to confirm the procedure


