Sem produtos
Preços com IVA
Produto adicionado com sucesso ao seu carrinho de compras
Existem 0 produtos no seu carrinho de compras. Existe um produto no seu carrinho de compras.
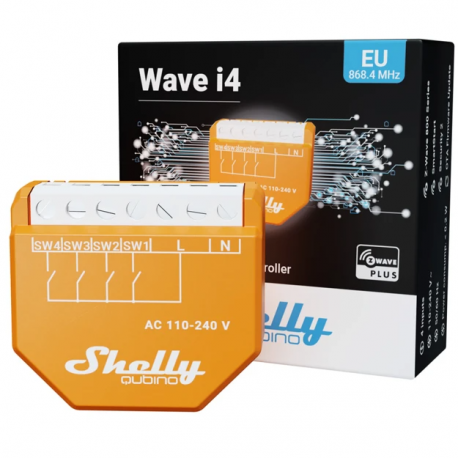
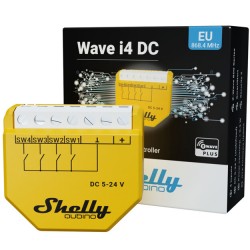
Shelly Qubino Wave i4 - micromodulo de control de 4 entradas digitales
QNSN-0A24XEU
Novo
O Shelly Qubino Wave i4 é um controlador Z-Wave™ com 4 entradas digitais. Active ou desactive manualmente qualquer cena criada, execute acções sincronizadas ou execute cenários de ativação complexos.
Em estoque
- Retirar este produto da minha lista de favoritos.
- Adicionar este produto à minha lista de favoritos.
Características tecnicas
| Tecnologia Domótica | Z-Wave Serie 800 |
Mais Informação
Active ou desactive manualmente qualquer cena criada, execute acções sincronizadas ou execute cenários de disparo complexos.
O Wave i4 é um dispositivo de leitura de entradas (não contém relés).
Controlo manual de outros dispositivos Z-Wave (por exemplo, com um interrutor multi-botão).
Multi-click - ativação de até 12 acções
Consumo de energia extremamente baixo: < 0,2 W
Banda de frequência Z-Wave: 868,4 MHz (países CEPT)
Tecnologia mais recente: Z-Wave Série 800
Configuração automática com SmartStart
Segurança autenticada 2 para o mais alto nível de segurança
Actualizações de firmware over-the-air
Funciona com gateways Z-Wave certificados e mais de 4.000 dispositivos Z-Wave
*Um smart hub não está incluído. É necessário um smart hub para a configuração do dispositivo.
PORQUÊ WAVE I4?
Substitua um dos interruptores do seu quarto
e controle qualquer outro dispositivo Z-Wave instalado
dispositivo Z-Wave instalado!
O Wave i4 permite-lhe ativar ou desativar manualmente qualquer cena criada, executar acções sincronizadas ou executar cenários de ativação complexos. Pode utilizá-lo para controlar outros dispositivos Z-Wave na sua rede com o toque de um botão. Graças ao seu design retrofit, é suficientemente pequeno para caber atrás de qualquer interrutor de parede. O Wave i4 pode apresentar o estado e controlar a ação de quatro entradas, oferecendo a máxima comodidade ao permitir o controlo manual da sua casa inteligente a todos os membros da família.
INTRODUÇÃO AO Z-WAVE
Shelly Qubino trabalha com Z-Wave
Ao utilizar a tecnologia Z-Wave, os produtos para casa inteligente podem comunicar sem problemas entre si, independentemente da marca ou plataforma, graças a um hub inteligente centralizado! Os dispositivos Shelly Qubino funcionam com a última geração de chips Z-Wave (S800), uma das tecnologias de casa inteligente normalizadas mais populares do mundo.
*Os dispositivos Z-Wave têm requisitos específicos para funcionarem corretamente, como a necessidade de utilizar um hub Z-Wave compatível.
Para mais informações, visite o sítio Web oficial da Z-Wave: www.z-wave.com.
INTRODUÇÃO À Z-WAVE
Funciona com qualquer gateway Z-Wave
O Wave i4 é retrofit e foi concebido para ser instalado atrás de interruptores/botões de pressão. Uma vez instalado, inclua o dispositivo na sua rede Z-Wave (é necessário um gateway Z-Wave) e controle-o através do seu smartphone ou tablet. Os dispositivos Shelly Qubino funcionam com mais de 4000 dispositivos e gateways certificados Z-Wave.
Características
Funciona com Z-Wave
Adicione o Wave i4 à sua rede Z-Wave e controle-o remotamente. Compatível com todos os gateways Z-Wave certificados.
Suporte multi-click
Até 12 acções possíveis. Controle as luzes, feche as persianas, desligue as tomadas. Controle manualmente qualquer dispositivo Z-Wave na sua rede e execute as cenas que desejar.
Ampla gama de tensões
O Wave i4 pode ser alimentado por 110-240 V AC.
Parcerias
Estabeleça comunicação direta entre dispositivos na sua rede Z-Wave local e configure acções sem necessidade de um hub. Defina até 8 associações nos botões do interrutor e active-as manualmente.
Cenas inteligentes
Configure cenas personalizadas, combinando o Wave i4 com qualquer outro dispositivo Z-Wave (é necessário um gateway).
Aplicações de utilização infinitas
CASOS DE USO
Suporte multi-ação
Com o premir de um botão, pode ativar até 12 cenas ou acções de outros dispositivos Z-Wave na sua rede. O Wave i4 suporta até 3 acções de automação diferentes por botão, tornando-o extremamente conveniente para o controlo manual rápido de um grupo de dispositivos.
Instale o Wave i4 onde melhor lhe convier e configure botões para controlar simultaneamente luzes, persianas e outros dispositivos em divisões específicas ou em todo o edifício.
Ativação de cenas.
1 clique
Desligar dispositivos multimédia
2 cliques
Fechar os estores
1 clique longo (premir e manter premido)
Ligar/desligar as luzes do átrio
Ativar até 8 acções sem gateway!
O Wave i4 permite-lhe estabelecer uma comunicação direta entre os seus dispositivos Z-Wave e configurar várias associações sem a necessidade de um hub* Ao suportar 2 associações por botão, o Wave i4 permite-lhe ativar e executar até 8 acções e, portanto, controlar perfeitamente vários dispositivos Z-Wave com o toque de um botão.
Exemplos.
1 toque (para comandos básicos)
Ligar/desligar luzes
1 clique longo (premir e manter premido) (para comandos de vários níveis)
Diminuir as luzes ou abrir/fechar estores
*É necessário um gateway/hub para configurar o dispositivo.
MODOS DE UTILIZAÇÃO
Máxima comodidade
Uma das coisas mais frustrantes é aperceber-se de que se esqueceu de apagar as luzes da sala de estar antes de ir para a cama. Especialmente quando o telemóvel não está por perto - mas não se preocupe! O Wave i4 permite o controlo manual de outros dispositivos Z-Wave com um interrutor - agora o controlo total da sua casa está apenas ao alcance da mão!
CASOS DE USO
Controlo de cenas complexas
Ativar ou desativar manualmente cenas complexas. Com o Wave i4, pode executar acções sincronizadas a partir de vários dispositivos Z-Wave. Pode instalar o Wave i4 perto da porta da frente da sua casa e desligar/ligar todas as luzes da sua casa com o premir de um botão, poupando-lhe tempo quando está com pressa.
Combinação perfeita
O Wave i4 é a combinação perfeita para o interrutor de parede Shelly para relés inteligentes, um interrutor de 4 botões. Cada botão pode ativar até 4 acções diferentes. Isto significa que um único interrutor de 4 botões permite ativar e executar até 16 cenários. Graças às suas dimensões compactas e cablagem simples, o interrutor de parede Shelly pode ser instalado em qualquer consola de interruptores existente ou mesmo nos espaços mais apertados. Não é necessário aumentar o espaço da parede ou modificar a cablagem.
| Power supply | AC110-240 V, 50/60 Hz |
|---|---|
| Power supply DC | No |
| Power consumption | < 0.2 W |
| Overload protection | No |
| Power measurement | No |
| Working without a neutral line | No |
| Number of inputs | 4 |
| Distance | up to 40 m indoors (131 ft.) (depends on local condition) |
| Z-Wave repeater: | Yes |
| CPU | Z-Wave S800 |
| Z-Wave frequency band | 868,4 MHz; |
| Maximum radio frequency power transmitted in frequency band(s) | < 25mW |
| Size (H x W x D) | 37x42x16 0.5 mm / 1.46x1.65x0.63 0.02 in |
| Weight | 17 g / 0.6 oz |
| Mounting | Wall console |
| Screw terminals max. torque | 0.4 Nm / 3.5 lbin |
| Conductor cross section | 0.5 to 1.5 mm²/ 20 to 16 AWG |
| Conductor stripped length | 5 to 6 mm / 0.20 to 0.24 in |
| Shell material | Plastic |
| Color | Orange |
| Ambient temperature | -20°C to 40°C / -5°F to 105°F |
| Humidity | 30 % to 70 % RH |
Informação alargada da Z-Wave (Inglês)
Note! In case of Security 2 (S2) adding (inclusion), a dialog will appear asking you to enter the corresponding PIN Code (5 underlined digits) that are written on the Z-Wave® DSK label on the side of the Device and on the Z-Wave® DSK label inserted in the packaging.
IMPORTANT: The PIN Code must not be lost.
6.1.1. SmartStart adding (inclusion)
SmartStart enabled products can be added into a Z-Wave® network by scanning the Z-Wave® QR Code present on the Device with a gateway providing SmartStart inclusion. No further action is required, and the SmartStart device will be added automatically within 10 minutes of being switched on in the network vicinity.
1. With the gateway application scan the QR code on the Device label and add the Security 2 (S2) Device Specific Key (DSK) to the provisioning list in the gateway.
2. Connect the Device to a power supply.
3. Check if the blue LED is blinking in Mode 1. If so, the Device is not added to a Z-Wave® network.
4. Adding will be initiated automatically within a few seconds after connecting the Device to a power supply, and the Device will be added to a Z-Wave® network automatically.
5. The blue LED will be blinking in Mode 2 during the adding process.
6. The green LED will be blinking in Mode 1 if the Device is successfully added to a Z-Wave® network.
6.1.2. Adding (inclusion) with the S button
1. Connect the Device to a power supply.
2. Check if the blue LED is blinking in Mode 1. If so, the Device is not added to a Z-Wave® network.
3. Enable add/remove mode on the gateway.
4. To enter the Setting mode, quickly press and hold the S button on the Device until the LED turns solid blue.
5. Quickly release and then press and hold (> 2s) the S button on the Device until the blue LED starts blinking in Mode 3. Releasing the S button will start the Learn mode.
6. The blue LED will be blinking in Mode 2 during the adding process.
7. The green LED will be blinking in Mode 1 if the Device is successfully added to a Z-Wave® network.
Note! In Setting mode, the Device has a timeout of 10s before entering again into Normal mode.
6.1.3. Adding (inclusion) with a switch/push-button
1. Connect the Device to a power supply.
2. Check if the blue LED is blinking in Mode 1. If so, the Device is not added to a Z-Wave® network.
3. Enable add/remove mode on the gateway.
4. Toggle the switch/push-button connected to any of the SW terminals (SW, SW1, SW2, etc.) 3 times within 3 seconds (this procedure puts the Device in Learn mode*). The Device must receive on/off signal 3 times, which means pressing the momentary switch 3 times, or toggling the switch on and off 3 times.
5. The blue LED will be blinking in Mode 2 during the adding process.
6. The green LED will be blinking in Mode 1 if the Device is successfully added to a Z-Wave® network.
*Learn mode - a state that allows the Device to receive network information from the gateway.
Note! The Device will be removed from your Z-Wave® network, but any custom configuration parameters will not be erased.
6.2.1. Removing (exclusion) with the S button
1. Connect the Device to a power supply.
2. Check if the green LED is blinking in Mode 1. If so, the Device is added to a Z-Wave® network.
3. Enable add/remove mode on the gateway.
4. To enter the Setting mode, quickly press and hold the S button on the Device until the LED turns solid blue.
5. Quickly release and then press and hold (> 2s) the S button on the Device until the blue LED starts blinking in Mode 3. Releasing the S button will start the Learn mode.
6. The blue LED will be blinking in Mode 2 during the removing process.
7. The blue LED will be blinking in Mode 1 if the Device is successfully removed from a Z-Wave® network.
Note! In Setting mode, the Device has a timeout of 10s before entering again into Normal mode.
6.2.2. Removing (exclusion) with switch/push-button
1. Connect the Device to a power supply.
2. Check if the green LED is blinking in Mode 1. If so, the Device is added to a Z-Wave® network.
3. Enable add/remove mode on the gateway.
4. Toggle the switch/push-button connected to any of the SW terminals (SW, SW1, SW2,…) 3 times within 3 seconds (this procedure puts the Device in Learn mode). The Device must receive on/off signal 3 times, which means pressing the momentary switch 3 times, or toggling the switch on and off 3 times.
5. The blue LED will be blinking in Mode 2 during the removing process.
6. The blue LED will be blinking in Mode 1 if the Device is successfully removed from a Z-Wave® network.
6.3.1 Factory reset general
After Factory reset, all custom parameters and stored values (kWh, associations, routings, etc.) will return to their default state. HOME ID and NODE ID assigned to the Device will be deleted. Use this reset procedure only when the gateway is missing or otherwise inoperable.
6.3.2 Factory reset with the S button
Note! Factory reset with the S button is possible anytime.
1. To enter the Setting mode, quickly press and hold the S button on the Device until the LED turns solid blue.
2. Press the S button multiple times until the LED turns solid red.
3. Press and hold (> 2s) S button on the Device until the red LED starts blinking in Mode 3. Releasing the S button will start the factory reset.
4. During factory reset, the LED will turn solid green for about 1s, then the blue and red LED will start blinking in Mode 3 for approx. 2s.
5. The blue LED will be blinking in Mode 1 if the Factory reset is successful.
6.3.3 Factory reset with a switch/push-button
Note! Factory reset with a switch/push-button is only possible within the first minute after the Device is connected to a power supply.
1. Connect the Device to a power supply.
2. Toggle the switch/push-button connected to any of the SW terminals (SW, SW1, SW2,…) 5 times within 3 seconds. The Device must receive on/off signal 5 times, which means pressing the push-button 5 times, or toggling the switch on and off 5 times.
3. During factory reset, the LED will turn solid green for about 1s, then the blue and red LED will start blinking in Mode 3 for approx. 2s.
4. The blue LED will be blinking in Mode 1 if the Factory reset is successful.


